Copeland Park Studio Move: Art Equipment Handling
Moving an art studio is not the same as moving a flat, an office, or even a room full of standard furniture. Brushes, easels, canvases, drying racks, sculpture materials, lighting, frames, portfolio boxes, and the odd fragile piece that you've probably had for years all need different handling. That is why a Copeland Park Studio Move: Art Equipment Handling plan has to be practical, careful, and properly thought through from the start.
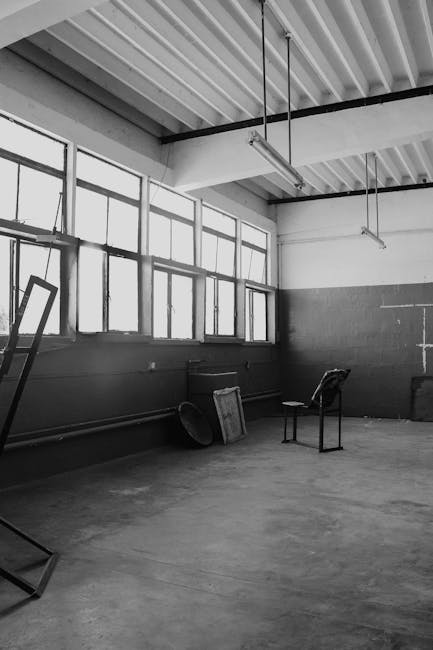
If you're based near Copeland Park in Peckham, you'll already know the area has its own quirks: tight access, busy streets, mixed-use buildings, and the usual London reality of stairs, awkward corners, and not quite enough parking. Truth be told, art gear and creative equipment do not forgive rushed handling. A small knock can ruin a frame; poor packing can crush a stack of prints; one careless lift can leave a heavy worktable damaged or impossible to assemble again.
This guide breaks down how to move studio equipment safely, what to prioritise, where the risks usually appear, and how to make the whole process smoother. It also covers the practical side of hiring support, comparing options, and knowing when specialist help is worth it. If you want a move that feels organised rather than chaotic, you're in the right place.
- Why it matters
- How the process works
- Key benefits
- Who this is for
- Step-by-step guidance
- Expert tips
- Common mistakes
- Tools and resources
- Law, compliance and best practice
- Options and comparison
- Real-world example
- Practical checklist
- Conclusion
- Frequently asked questions
Why Copeland Park Studio Move: Art Equipment Handling Matters
Art equipment is often a mix of delicate, awkward, expensive, and deeply personal items. That combination is exactly why careless handling causes problems. A studio move is not only about getting things from A to B. It's about protecting working tools, preserving artwork, and keeping the studio functional so you can get back to creating without a long delay.
At Copeland Park, many creatives work with bulky canvases, screen-printing materials, ceramic tools, sculpture pieces, photography gear, or display hardware. Some of it is fragile in obvious ways. Some is fragile in sneaky ways. A metal lamp stand may look tough, but the shade bracket can bend easily. A sealed box of prints may seem safe until it is stored flat under a heavy item and comes out dented. The problems often come from stacking, poor labelling, or using the wrong packing materials.
There is also a business side to this. If your studio is client-facing, any delay in reopening can affect bookings, exhibitions, commissions, or teaching schedules. Even if you work alone, a disorganised move can mean missing tools for days. Not ideal. A proper handling plan reduces downtime and protects the value of your stock, equipment, and time.
For a broader look at how removals are organised in the area, it can help to explore the wider services overview and the dedicated removal services in Peckham available for different kinds of moves.
Table of Contents
- Why Copeland Park Studio Move: Art Equipment Handling Matters
- How Copeland Park Studio Move: Art Equipment Handling Works
- Key Benefits and Practical Advantages
- Who This Is For and When It Makes Sense
- Step-by-Step Guidance
- Expert Tips for Better Results
- Common Mistakes to Avoid
- Tools, Resources and Recommendations
- Law, Compliance, Standards, or Best Practice
- Options, Methods, or Comparison Table
- Case Study or Real-World Example
- Practical Checklist
- Conclusion
- Frequently Asked Questions
How Copeland Park Studio Move: Art Equipment Handling Works
The best studio moves follow a simple logic: assess, sort, protect, transport, and reset. That sounds obvious, but the quality is in the detail. A good handling process starts long before the van arrives.
First, items are grouped by type and fragility. For example, framed work should not be packed with metal tools. Easels should be disassembled where possible. Paints, solvents, and aerosols need to be checked separately because some items require extra care and may not be suitable for standard packing together. Heavy equipment should be identified early so the team can plan lifting, vehicle load order, and access routes.
Next comes protection. This usually means wrapping, padding, boxing, and labelling. Materials matter here. Acid-free paper is often useful for artwork, bubble wrap is fine for some items but not everything, and corner protectors can save a frame from the most annoying little impacts. A rushed wrap job is one of the biggest causes of damage, to be fair. It looks "done" until the box is opened.
Then comes the load plan. In a studio move, the van is not just a vehicle; it is part of the protection system. Fragile artwork should not be buried under canvases, shelving, or heavy benches. The load should be arranged with the same care you'd use setting up a gallery wall: stable, balanced, and sensible.
If you need support with lifting, loading, and careful transit, a local man and van in Peckham can be a practical option, especially when you do not need a full-scale removals crew but still want reliable help.
Key Benefits and Practical Advantages
A well-planned studio move brings more than peace of mind. It protects the working rhythm of the studio and reduces the hidden costs that show up later.
- Less damage risk: Proper wrapping and positioning protect artwork, tools, and equipment from knocks and pressure.
- Faster setup: Clear labels and item grouping make it much easier to unpack and resume work.
- Better inventory control: You can spot missing items quickly instead of discovering them weeks later.
- Reduced stress: A structured move feels manageable rather than frantic.
- Safer handling: Heavy or awkward items are moved with the right lifting method and equipment.
- Lower disruption to clients: If your studio supports bookings or commissions, downtime is kept shorter.
There's also a quieter benefit that many people only notice afterwards: confidence. When you know the move has been handled carefully, the new space feels usable straight away. You're not opening box after box muttering, "Where on earth did that go?"
For items like benches, storage units, or display furniture, the same principles used in furniture removals in Peckham can be adapted to suit the more delicate needs of a studio environment.
Who This Is For and When It Makes Sense
This kind of move is relevant to a wide range of creatives and small businesses. If your workspace contains anything that would be annoying, expensive, or heartbreaking to replace, you'll want a proper handling plan.
- Artists moving between studios
- Creative collectives sharing workspace
- Potters and sculptors with heavy tools or fragile pieces
- Photographers with lighting stands, backdrops, and camera gear
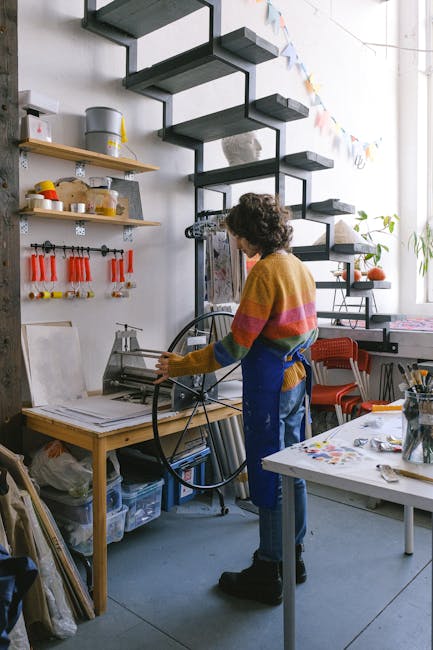
- Printmakers with presses, screens, and drying racks
- Framers and illustrators with finished work and stock
- Students leaving a shared creative space
It also makes sense when the move is time-sensitive. Maybe your lease ends on Friday. Maybe an exhibition installation is due the following week. Maybe you've got the new studio on a third-floor walk-up, and the access alone makes you sigh a bit. In those moments, a careful plan is not optional.
If the space is part of a larger move, you may also find it useful to read about office removals in Peckham and flat removals in Peckham, because many studio moves sit somewhere between those two categories.
Step-by-Step Guidance
Here is a practical way to approach the move without overcomplicating it. Simple steps, done properly, will usually beat a fancy system that nobody sticks to.
- Audit the studio. Make a list of equipment, artwork, materials, fragile items, and anything awkward or heavy.
- Separate by type. Group canvases, framed work, tools, storage, electronics, and consumables into clear categories.
- Decide what travels and what does not. Studio moves are a good excuse to declutter. If something is broken beyond repair or never used, don't give it a seat in the van.
- Pack fragile work first. Begin with the items that need the most care so you are not rushing them at the end of the day.
- Label clearly. Add room names, item contents, and "fragile" where needed. Use labels that actually make sense three hours later.
- Protect corners and surfaces. Frames, canvases, screens, and tabletops benefit from corner guards, blankets, and surface wrap.
- Plan the load order. Heavy pieces go in first and low; delicate items sit secure and away from pressure.
- Check access at both ends. Stairs, narrow hallways, parking, lifts, and unloading distance all matter. A lot.
- Set up a first-day box. Put in essentials like tape, scissors, chargers, fixings, gloves, cleaning cloths, and the tools you will need immediately.
A small but useful habit: take photos before you dismantle anything. That includes shelving layouts, cable routes, and how shelves were loaded. It feels tedious in the moment, then it saves you twenty minutes later and a fair bit of swearing.
If you are gathering supplies, a good starting point is packing and boxes in Peckham, especially for sturdy cartons, wrapping materials, and the sort of things that keep a move from becoming a cardboard nightmare.
Expert Tips for Better Results
These are the details that tend to make the biggest difference in real life. They're not glamorous, but they work.
Use the right protection for the right item
Not everything should be bubble-wrapped the same way. Canvas needs surface protection without crushing texture. Frames need corner defence. Sculptural pieces may need custom padding. Electronics need stable packing and cable separation. One-size-fits-all packing often causes more harm than good.
Keep weight low and centred
Heavy items should sit at the bottom of boxes or against the van floor, not stacked high. A tall, unstable load is asking for trouble. Even a short journey can create shifting if the weight is poorly balanced.
Bundle loose parts together
Bolts, shelf pins, brackets, and tool attachments should be bagged and labelled with the item they belong to. It sounds basic, but that little bag can save a full hour of hunting later. Maybe more.
Protect climate-sensitive materials
Some art materials and finished pieces do not like damp, heat, or sudden changes in temperature. If the move involves temporary storage, keep these items in a dry, stable environment and avoid leaving them in a van for long periods.
Leave breathing room around delicate work
Pressure damage is often overlooked. A box can look fine on the outside while the contents are crushed by a tight stack. Delicate items need a little space, even if it means using one more box.
For heavier workshop-style equipment, some of the same logic used in our heavy object lifting guide can help you decide whether a two-person lift or specialist support is the safer option.
Common Mistakes to Avoid
Most damage in studio moves comes from a handful of repeat mistakes. The good news? They're avoidable.
- Packing finished work too early without a clear stack plan. Finished pieces need the cleanest, safest space in the load.
- Using weak boxes for heavy items. A box that buckles under weight is not "good enough for now." It is a problem waiting to happen.
- Leaving labels vague. "Tools" is not enough when you have six tool boxes and three shared shelves.
- Forgetting access details. A beautiful packing plan can still fail if the van cannot park or the lift is out of action.
- Wrapping items without checking for moisture or dust. Trapped damp is especially unhelpful for paper, wood, and some paint finishes.
- Overfilling boxes. A heavy box is harder to lift and more likely to fail.
One of the more common emotional mistakes is trying to do too much in one go. People want the old studio cleared, packed, moved, and reset in a single day. Sometimes that works. Often it doesn't. If the move is complex, split it into phases. Your back will thank you. So will your patience.
Tools, Resources and Recommendations
You do not need specialist kit for every move, but the right tools save time and reduce damage. For most studio relocations, the useful basics include:
- Double-walled boxes
- Acid-free tissue or paper for artwork
- Bubble wrap for selected items
- Furniture blankets
- Corner protectors
- Strong tape and tape dispensers
- Marker pens and printed labels
- Ratchet straps or load restraints
- Gloves with grip
- Steady trolleys or sack trucks where appropriate
Some studios also benefit from short-term storage if the new space is not ready on the same day. That can be especially useful when you are moving a mixed load and need breathing room for installation or fit-out work. If that sounds familiar, have a look at storage in Peckham for a practical stopgap.
It can also help to review broader moving preparation advice, such as packing expertise tips and the ultimate decluttering plan for a move, since a cleaner load list makes art handling easier from the start.
Law, Compliance, Standards, or Best Practice
For most studio moves, the main compliance concerns are health and safety, manual handling, access, and sensible care of belongings. In the UK, employers and self-employed professionals still have duties to carry out work safely and avoid predictable harm. That means planning lifts, using suitable equipment, and not asking one person to carry something awkward simply because it looks manageable.
If your move includes staff, assistants, or contractors, make sure everyone understands the load plan and their role in it. Keep walkways clear. Check that items do not block fire routes during packing. If you are handling solvents, aerosols, or other potentially hazardous materials, follow the product guidance and separate anything that should not be packed with general studio stock.
Insurance is another point worth taking seriously. Not every policy covers every kind of movement automatically, and some artwork or specialist equipment may need declared value or specific protection. You should always check what is covered before the move day, not after. That is the moment where people usually discover the paperwork they wish they had read last week.
For reassurance around standards, safety, and service expectations, these pages are worth a look: insurance and safety, health and safety policy, and terms and conditions.
Options, Methods, or Comparison Table
There is more than one way to handle a studio move. The right method depends on the size of the space, the value of the equipment, the access, and how quickly you need to reopen.
| Method | Best for | Strengths | Limitations |
|---|---|---|---|
| DIY move | Very small studios with light items | Low direct cost, full control | Higher risk of damage, slower, physically demanding |
| Man and van support | Small to medium studio moves | Flexible, practical, good for access-heavy areas | May need more packing done in advance |
| Full removals service | Larger, mixed, or high-value moves | More hands, more coordination, better for complex loads | Usually costs more |
| Storage + staged move | Moves with delayed access or phased setup | Reduces pressure, helps with fit-out and timing | Extra handling step, may add coordination |
In practice, many Copeland Park studios land somewhere in the middle. They need more care than a normal house move, but not always a full commercial relocation team. A staged approach with careful loading often gives the best balance.
Case Study or Real-World Example
Imagine a small print studio moving from a first-floor unit near Copeland Park to a nearby workspace with a narrower entrance and a shorter loading window. The studio has framed editions, a drying rack, storage drawers, paper stock, inks, a heavy worktable, and two lighting stands that always seem lighter than they really are.
The move begins the day before with sorting. Finished prints are packed flat in clearly marked boxes. Frames are wrapped individually, corners protected, and stacked upright rather than laid under weight. The worktable is dismantled and the fixings bagged in a label pouch attached to the main frame. Paper stock is kept dry and separate from inks. The lighting stands are bundled together, with cables taped neatly so they do not snag.
On move day, the heaviest items are loaded first. The worktable goes in low and secure. The framed work is loaded last, positioned so nothing presses on the fronts. The team leaves the first-day box nearest the door at the new studio, which saves a lot of fiddly searching. The result is not just a successful move, but a usable space by late afternoon. No drama. No mystery boxes. Just a studio that can start breathing again.
That kind of outcome is why planning matters. It does not need to be perfect. It just needs to be sensible, calm, and a bit methodical.
Practical Checklist
Use this as a final run-through before moving day.
- Make a full inventory of artwork, tools, furniture, and materials
- Mark fragile, heavy, and priority items clearly
- Set aside items that should not be moved with general stock
- Pack finished work with extra surface and corner protection
- Disassemble large items where safe and practical
- Bag and label screws, brackets, and fittings
- Prepare a first-day essentials box
- Check access, parking, and stair routes at both locations
- Confirm insurance and handling expectations
- Keep valuable or irreplaceable items separate and supervised
- Leave a clear unpacking plan for the new studio
Practical summary: if the item is fragile, awkward, valuable, or hard to replace, it deserves slower handling, better packing, and a clearer plan. That is the whole game, really.
Conclusion
A Copeland Park studio move is one of those jobs where the details matter more than the headline. Art equipment handling is not just about moving stuff. It is about protecting creative work, avoiding avoidable damage, and helping you reopen quickly with as little friction as possible. Done well, the move feels controlled. Done badly, it becomes a week of annoyance you did not need.
The good news is that most problems are preventable with clear sorting, the right packing materials, sensible lifting, and a vehicle load plan that respects fragile items. Whether you are moving a compact creative corner or a full working studio, thoughtful handling pays off. Every time.
If you're planning a studio relocation and want a steadier, less stressful approach, it helps to speak with a team that understands local access, careful loading, and practical moving support. And if you want to know more about the people behind the service, start with about us or use the contact page to ask about your move.
Get a free quote today and see how much you can save.
There's a lot to juggle in a studio move, but with the right plan, you really can keep the creative rhythm intact. One careful step at a time.
Frequently Asked Questions
What is the best way to handle artwork during a studio move?
Use clean, protective packing materials, keep artwork upright or flat only when appropriate, and avoid stacking heavy items on top. Frames and finished pieces need extra corner and surface protection.
How do I move fragile art equipment safely?
Separate fragile items from heavy tools, wrap them individually, label them clearly, and load them in a stable position in the van. If something feels awkward to carry, it probably is.
Should I pack canvases flat or upright?
It depends on the size, frame, and surface. Many framed works travel better upright with protection between pieces, while some unframed canvases need flat support. The key is avoiding pressure on the painted surface.
Can I move solvents and paint with the rest of the studio contents?
Some products may need special care, ventilation, or separation based on their labels and handling guidance. Always check the product instructions before packing them with general items.
Is a man and van service enough for a studio move?
For many small to medium studios, yes. It can be a practical choice if you have already packed properly and need help with lifting, loading, and transport rather than a full packing crew.
How early should I start preparing a studio move?
Ideally, start at least a couple of weeks in advance if you have fragile artwork, heavy equipment, or a lot of stock. Smaller moves can be done faster, but advance sorting always helps.
What should go in a first-day box for the new studio?
Include tape, scissors, markers, chargers, cleaning cloths, basic tools, gloves, and any fixings you will need to reassemble furniture or storage units quickly.
Do I need insurance for moving art equipment?
It is wise to check. Not all policies cover every item in every situation, and some valuable or specialist pieces may need specific cover. Review the policy before the move, not after.
How do I reduce damage to frames and prints?
Use rigid boxes or flat-pack protection where suitable, add corner protection, avoid overfilling, and keep them away from pressure points in the van. Small shifts can do a surprising amount of harm.
What is the biggest mistake people make in studio moves?
Rushing the packing. People often focus on the van booking and leave the packing plan until the last minute. That is when items get mixed together, labels go missing, and damage happens.
How do I choose between storage and direct moving?
If the new space is not ready, access is restricted, or you need to phase the setup, storage can be useful. If the space is ready and you want to reopen quickly, direct moving is usually simpler.
Where can I get help with a studio relocation in Peckham?
Start by reviewing the available removals in Peckham options and reach out for a tailored quote. That way, you can match the service to the size and complexity of your move.